Hi semua,
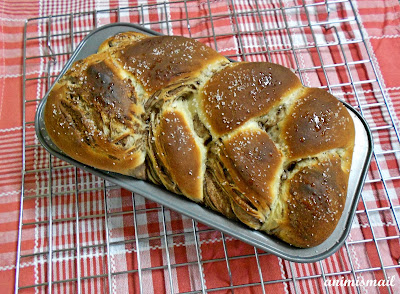
Sebenarnya dah lama sgt teringin nk buat roti marble jenis ni..selalu buat marble yg biasa2 je. Bila terpandang rupa roti ni di blog Anh's, terus tergoda & melompat2 hati nk try buat.hahaha..(ayat x menahan). Kalau x pecaya, korang tengok la sendiri..sy punya ni memang bagai langit & bumi la kalau nk dibandingkan..huhu
Roti ni jugak sangat unik..sebab resipi nya menggunakan whipping cream. Itu lah yg membuatkan rasanya sangat milky & menjadi sangat gebu. Cara nak buat layer coklat tu sebenarnya sama mcm kita nk buat puff pastry..kaedah yg sama. Tp x perlu la kuar masuk peti sejuk..canai & lipat, buat beberapa kali. Cara yg lengkap ada di blog Anh's ya..korang boleh tengok kat sana.
Bila makan roti ni masa suam2, fuhhhh..dengan rasa coklat nya yg agak meriah, kegebuan yg menggoda lg..kalau mkn sekeping memang x cukup la. Terima kasih pada penyumbang resipi yg sangat bijak ni. Sy kongsikan resipi nya di sini ya..
Japanese Style Chocolate Multi-Layer Marble Bread
by: Anh's
Method:
2. When the dough cycle is completed, punch down the bread dough to release the air and let it rest for 10 minutes before proceeding with the recipe.
by: Anh's
For the chocolate
sheet
30g dark
chocolate
55g milk
1 tablespoon
cocoa powder
15g plain flour
1.5 tbp corn
starch
15g sugar
2 tbps condensed
milk
For the bread
dough
Ingredients
220g bread flour
30g cake flour
1tsp salt
1 tsp dry yeast
70g sugar
1 egg
100ml milk
45ml whipping
cream
15g melted butter
Prepare the bread dough first!
1. Put all ingredients into the bread machine as per instructions for your machine in the dough cycle. (If you do not have a bread machine, simply knead the dough with an electric stand-mixer. Remember separate the yeast from salt and sugar to avoid the dehydration.
1. Put all ingredients into the bread machine as per instructions for your machine in the dough cycle. (If you do not have a bread machine, simply knead the dough with an electric stand-mixer. Remember separate the yeast from salt and sugar to avoid the dehydration.
Knead until gluten is fully developed and the dough
is elastic, smooth, non-sticky and leave from sides of mixing bowl. Cover with
a damp towel and allow the dough to ferment until double in size, about 60
minutes).
2. When the dough cycle is completed, punch down the bread dough to release the air and let it rest for 10 minutes before proceeding with the recipe.
Prepare the chocolate sheet
Put the chocolate in a bowl, and microwave on High for 40s. Take out, stir. If the chocolate is not melted, continue to microwave at 5-10 seconds increment. When the chocolate is melted, mix in the other ingredients. Mix well to combine and avoid any lump.
Put the chocolate in a bowl, and microwave on High for 40s. Take out, stir. If the chocolate is not melted, continue to microwave at 5-10 seconds increment. When the chocolate is melted, mix in the other ingredients. Mix well to combine and avoid any lump.
Put
the bowl onto the microwave again. This time for 50 seconds. Take out, give it
a good stir. It should be sticky and forming a dough by now. Keep stirring
until everything combined.
Spread
the chocolate sheet onto the cling wrap. Roll out thinly, store in the fridge
while waiting for the bread dough to be ready.
Forming the bread layer
After the dough has rested, roll the dough onto a floured surface to a rectangular around 30x40cm. Place the chocolate sheet on top. The chocolate sheet should be well inside the bread dough. Wrap the bread dough onto the chocolate sheet. Use your hand to pat down and flatten the dough.
After the dough has rested, roll the dough onto a floured surface to a rectangular around 30x40cm. Place the chocolate sheet on top. The chocolate sheet should be well inside the bread dough. Wrap the bread dough onto the chocolate sheet. Use your hand to pat down and flatten the dough.
Using a rolling pin, roll
the dough into a thin rectangular shape, 20x40cm. Fold the dough in three
lengthwise.
Turn 90 degree. Repeat the above step. Roll the dough
thinly, then fold in three lengthwise. The more `turn´ you make, the more
marbling effects you will have. I turn the dough around 4 times.
Finally, roll the dough into
20x40cm rectangular. Cut the dough into three long strips. Braid them together,
put into a greased loaf pan. Cover with cling wrap, and let them ferment in a
warm place until doubled (around 40-60 mins depending on your room
temperature).


0 comments:
Post a Comment